How to Install an Under-Sink Water Filter: A Step-by-Step Guide
Recommended picks

Tools and Materials You Will Need
For most under-sink filters you need an adjustable wrench, a drill with a step bit or hole saw sized to your faucet, Teflon tape, a bucket, and a towel. The filter kit usually ships with compression fittings, plastic tubing, and a mounting bracket. If you are installing an RO system such as the Apec Water ROES-PH75, which fits into a 15.5 by 17.5 inch footprint, also have a drain saddle clamp and a 3/8-inch drain line on hand. A saddle valve for the cold-water supply is included with many kits but check the box before you start. Pick up a small tube cutter if you need to cut copper or plastic supply lines cleanly.
Step 1: Shut Off the Water and Clear the Cabinet
Locate the cold-water shut-off valve under the sink and turn it clockwise until it stops. Open the cold-water faucet at the sink to bleed pressure from the line. Put a towel and a bucket under the supply line before loosening anything. Clear out the cabinet so you have room to work. Many under-sink cabinets are tight, and trying to maneuver filter housings in a crowded space is the single biggest cause of cross-threaded fittings and cracked housings.
Step 2: Mount the Filter Housing and Tap the Supply Line
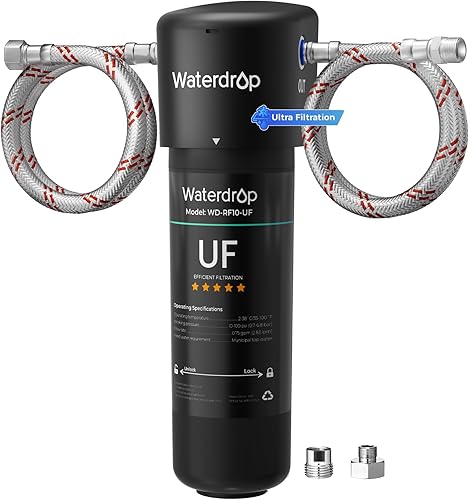
Decide where the filter housing will hang. Most systems mount to the cabinet side wall or back wall with the included bracket and screws. For compact inline units like the Waterdrop WD-10UA-UF (3.9 by 12.3 inches, 1.34 lb) the bracket attaches in seconds and the unit sits neatly beside the drain pipe. Once the bracket is up, connect the inlet supply line. If your kit includes a push-fit tee fitting, turn off the supply, cut the cold line cleanly, and push the tee in. If your kit uses a saddle valve, clamp it to the cold supply pipe and pierce the line with the built-in needle. Wrap all male threaded fittings with two layers of Teflon tape before threading them in.
Step 3: Install the Dedicated Faucet (RO and Dual-Outlet Systems)
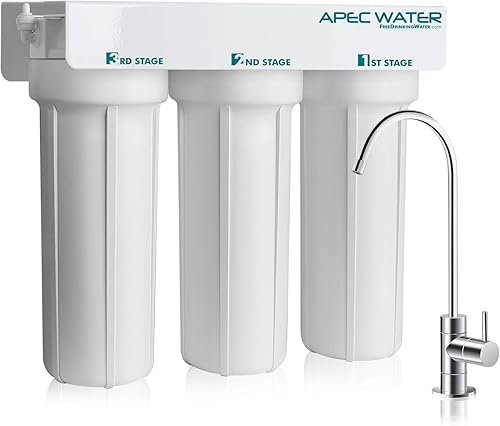
Under-sink RO systems and some advanced filters deliver filtered water through a separate faucet rather than through the main tap. You will need to drill a hole in the sink deck or countertop. Most sinks have a pre-drilled blank port, usually covered with a decorative cap. If not, use a step bit for stainless steel sinks or a hole saw on porcelain. The hole diameter is typically 1-3/8 inches. Feed the faucet supply line down through the hole and secure the faucet from below with the provided nut and washer. For the Apec Water WFS-1000 (15 by 12 inch housing, activated carbon), the system connects directly into the existing cold-water line so a dedicated faucet is optional depending on your configuration.
Step 4: Connect the Tank and Drain Line (RO Systems Only)
Reverse osmosis systems include a pressure storage tank and produce a small amount of wastewater that must drain into the sink drain pipe. Mount the tank upright in the cabinet. Connect the tank line to the system manifold using the color-coded push-fit fittings provided. For the drain connection, clamp the drain saddle to the drain pipe above the P-trap, never below it, and feed the drain line to the saddle port. Keep the drain line as short and straight as possible to avoid backpressure. A system like the iSpring RCC7P-AK (15 by 18 inch footprint, 75 gallons per day, 20 lb) comes with clear color coding on its five filter stages to make the tube routing straightforward.
Step 5: Turn On the Water and Check for Leaks
Slowly open the cold-water supply valve a quarter turn and watch every fitting for drips. Check the saddle or tee connection, the filter housing inlet and outlet, and any drain fittings. If a connection drips, hand-tighten first and then add a quarter-turn with a wrench. Once everything is dry, open the valve fully. For RO systems, allow the storage tank to fill for two to four hours before using the water. Many manufacturers recommend running the first one or two tankfuls to drain to flush the new membrane and carbon filters. Your flow rate and water quality will stabilize after that initial flush period.
Common mistakes to avoid
- Not turning off the cold-water supply fully before disconnecting lines, which causes flooding when a fitting is removed.
- Using a saddle valve on a plastic (CPVC or PEX) supply line it was not designed for, which can crack the pipe over time.
- Over-tightening plastic filter housing heads with a wrench, which cracks the housing threads and causes slow leaks.
- Installing the drain saddle below the P-trap, which lets sewer gases back-siphon into the system.
- Skipping the initial flush on a new RO system, which leaves carbon fines and manufacturing residue in the first water drawn.
- Routing the drain line with a dip or low point, which traps water and creates backpressure that reduces the system's production rate.
Frequently asked questions
Do I need a plumber to install an under-sink water filter?
Most homeowners can handle a standard under-sink filter installation without a plumber. The connections use push-fit or compression fittings that do not require soldering or specialized tools. If your cold-water supply line is an unusual material or your cabinet has no accessible shut-off valve, calling a plumber for that part of the job is a reasonable precaution.
How long does installation usually take?
A single-stage or two-stage inline filter typically takes 30 to 45 minutes. A full reverse osmosis system with a storage tank and dedicated faucet usually takes 60 to 90 minutes for a first-time installer. Having all your tools and a clear cabinet before you start cuts that time noticeably.
Can I install an under-sink filter on a rented apartment?
Many renters install under-sink filters using a push-fit tee that leaves the supply line intact and undamaged. When you move out, you remove the tee and reconnect the original line. Check your lease and get written permission from your landlord before drilling any holes in the sink for a dedicated faucet, as that is a permanent modification.
Why is my new filter producing slow water flow?
Low flow right after installation usually comes from one of three causes: the supply shut-off was not opened fully, the filter cartridge has a factory restriction that clears after flushing, or a push-fit fitting was not fully seated and is partially blocking the line. Check each connection, open the supply valve fully, and run water through the system for a few minutes. RO systems naturally have lower flow at the dedicated faucet than your main tap, and that is by design.
How often do I need to replace the filter after installation?
Replacement intervals depend on the filter technology and your household water volume. The Waterdrop WD-10UA-UF is rated for 8,000 gallons, while the Apec Water WFS-1000 is rated for 10,000 gallons on its activated carbon stage. For an RO system, pre-filters typically change every 6 to 12 months and the membrane every 2 to 3 years under normal use. Contact [email protected] if you have questions about a specific model.